For almost ten (10) years, my desktop, website, email server, and homelab have run on a single Linux machine. The machine was a Dell Precision T5500 with dual Xeon Cores, 24GB of memory, and two (2) NVIDIA Quadro GPUs. At that time, the machine was powerful enough to run all my services and homelab while also functioning as my desktop. The machine’s operating system began with Fedora Core 27 and was gradually upgraded through each release, up to Fedora Core 38, when it was retired. But for each upgrade of the operating system and applications, like Chrome, Evolution, VS Code and VirtualBox, the applications that I usually used, the machine started to get slower and slower. So, last November 2025, I decided to upgrade.
The original plan was to build a new machine, install the latest version of Fedora, and move everything from the old machine to the new one. But I was also open to buying a prebuilt machine, particularly a Mini PC. Mini PCs are small and compact, yet can be powerful. It was during my YouTube review-scouting that I came upon Proxmox. I came across several reviews of using Mini PCs for a home lab running Proxmox. I’ve never heard of Proxmox before, but I am familiar with KVM and QEMU. I have used them, but I find them less user-friendly when setting up virtual machines, which is why I used VirtualBox instead. So I wasn’t aware they’d built anything around them.
As I delve deeper into my Proxmox study, I find that it addresses the main issue I have with my old setup: isolation. As I mentioned earlier, my desktop, web server, and email server all run on a single Fedora server. When I need to reboot my desktop, it takes down my web and email servers. So running these services in separate environments will solve this issue.
The New Machine.
Typically, you would set up Proxmox in a cluster for high availability and redundancy. But since this is a homelab and not a production machine, and mainly due to budget constraints, the new setup will be a single-node, single-device Proxmox. This means there is still only one machine running all the services, except this time with isolation.
I eventually decided to build my new machine, and the components I used are as follows:
| Part | Vendor/Model/Description |
| CPU1 | AMD Ryzen 9 9900X Up to 5.6Gz, Base 4.4Gz, 12 cores, 24 Threads, 120W, Zen 5 |
| CPU Cooler2 | be quite Dark Rock 5 |
| Motherboard3 | MSI PRO B850-P WiFi |
| Memory4 | Corsair VENGEANCE DDR5 64GB (32GB x 2) 5600MHz CL40 |
| Storage5 | Samsung 990 PRO 1TB PCIe 4.0 x4 NVMe M.2 2280 SSD (MZ-V9P1T0BW) Samsung 990 EVO Plus SSD 1TB, PCIe Gen 4×4, Gen 5×2 M.2 2280 |
| Case6 | Fractal Design Define 7 Compact Solid ATX |
| Power Supply7 | Corsair RM850x |
| GPU8 | None |
A few notes that I would like to make regarding my choices:
- I originally planned to go with the AMD Ryzen 5950X because of its low power usage (this machine will run 24×7), but it’s hard to find, so I opted for the next-highest model with 12 cores. I eliminated Intel CPUs earlier in the process because of the number of reported issues with their 13th- and 14th-generation CPUs.
- I want a quiet machine because it will be placed under my desk. I’m also not into blinking RGB lights. So this model fits my requirement. The product claims that its maximum noise level is only 29.8 dBA. I initially opted for the Dark Rock Pro because it is quieter, but its height is very close to the computer case’s height limit.
- There are several good Motherboards out there, but this one just hit my price point. It also has several features for future upgrades, like three (3) M2 slots and four (4) SATA ports. It also has a WiFi adapter. You may come across comments on the Proxmox forum claiming that a Wi-Fi adapter is useless on a Proxmox machine. But not in my case. I will discuss this further below.
- When choosing memory, you must check whether the Motherboard supports it. You must also consider a future upgrade. Most AM5 motherboards have four (4) memory slots, but it is strongly advised that you use only two (2). But if you are to use all four (4) slots, the memory speed will drop significantly. For my chosen CPU, for example, it drops from 5600 to 3600. In hindsight, I should have just purchased 1x64GB of memory instead of 2×32 GB.
- The initial purchase was the PRO 1TB, which will go to slot 1, which supports PCIe 5.0. But there is a significant price difference between PCIe 5.0 and PCIe 4.0. The EVO Plus was added later, after the Proxmox installation, because I found one (1) TB for my main VMs’ virtual disks a bit tight for my setup, and it was on sale at Amazon.
- I have an old computer table designed to accommodate old computer cases, which were much smaller than the ones we have now. The challenge was to find a case that would fit the space on my computer table, and theFractal Design Define 7 Compact met that requirement. It’s a bit tight at the back where the cables are, but it’s workable. The case has padding that deadens the noise. You can choose between tempered glass and a solid side panel. I chose the solid side panel.
- This is not a gaming PC, and I don’t plan to install a power-hungry GPU, so an 850W power supply should be more than enough.
- The CPU has graphics capability, so there is really no need for a GPU.
Proxmox Installation & Configuration
Installing Proxmox is actually pretty straightforward. All you need to do is download its ISO, put it on a USB flash drive, and boot from there. You can get more details from this link.
In this section, I will focus primarily on my case: installing and configuring a single-node, single-device system with no internet connection during the initial phase. I am highlighting the lack of internet connection here because, in my case, my old machine is still connected to my ISP and cannot be disconnected, and my router is not easy to reach for a cable connection. More on this later.
After installing Proxmox, you can access its management tool using a browser at port 8006. If your machine is connected to a router or the internet, you can access your installation from another machine via the IP address you assigned during installation. But since this is a single-node single-device installation, we need to access it from the machine itself. To do this, we need to install a lightweight Windows manager that lets you run a browser, and here are the steps that you can follow to achieve this:
First, download the Debian ISO from another machine and copy it to a USB stick. Make sure the version matches the one your Proxmox installation uses. You then copy this ISO from the USB drive to your new machine’s local disks for faster access.
# /dev/sda1 is your USB
$ mount -t ext4 /dev/sda1 /root/mnt/debian
$ cp /root/mnt/debian/debian.iso /root/debian/iso
Mount the ISO as a loop device. Make sure that the owner is _apt and under the group root.
$ mkdir /tmp/debian
$ chown _apt:root /tmp/debian
$ mount -o loop,uid=42,gid=0 /root/debian/debian.iso /tmp/debian
Add the following lines to your /etc/apt/sources.list to trust your local ISO copy.
$ echo "deb [trusted=yes] file:/tmp/debian/ trixie main contrib" >> /etc/apt/sources.list
$ apt update
Install a lightweight Windows manager along with any tools you need to configure the OS and Proxmox. I chose XFCE as the Window manager. I also installed Mousepad in case I need a text editor. We also need to install the wireless packages to access the internet. You can install the browser and any other packages you want later, once we set up the internet connection.
apt`install xfce4 mousepad wireless-tools wpasupplicant sudoReboot the machine. After the reboot completes, you should see the Debian login screen.
Before you do anything else, I suggest you configure the UXTerm, the built-in terminal emulator, to make it more user-friendly, since you will be using it a lot. For example, you can increase the font size or change the font itself. To do this, you need to create the.Xresources file in your home directory with the following content, for example:
$ echo "UXTerm*faceSize: 10" > $HOME/.Xresources
$ echo "UXTerm*faceName: DejaVu Sans Mono" >> $HOME/.Xresources
$ xrdb -merge ~/.Xresources
Once you have configured your terminal emulator, you can set up internet access via the Wi-Fi interface.
First, create the /etc/wpa_supplicant/wpa_supplicant.conf file.
$ wpa_passphrase "your_ssid" "your_password" >> /etc/wpa_supplicant/wpa_supplicant.confNext, modify the /etc/network/interfaces and add the following entries:
auto wlp11s0
iface wlp11s0 inet dhcp
#       Wifi network interface.
        wpa-conf /etc/wpa_supplicant/wpa_supplicant.conf
Restart your network.
$ systemctl restart networkingWith an active internet connection, you can proceed to install a browser (e.g., Chromium) and any other necessary packages. Keep it to a minimum since this will not be your main working desktop. You also need to create a new user account to use from now on to log in to your Debian Windows Manager. Instead of logging in as root, log in with this user. This is not only a matter of best practice, but also because Chromium will not run under root.
# Create a user
$ adduser admin
: (answer all the prompts)
:
# Make the user a sudoer
$ usermod -aG sudo admin

# Install required packages
$ apt install chromium linux-cpupower virt-viewer
Log out from root and log in with the newly created user. Point your browser to https://localhost:8006 to access the Proxmox GUI.
Update your Proxmox
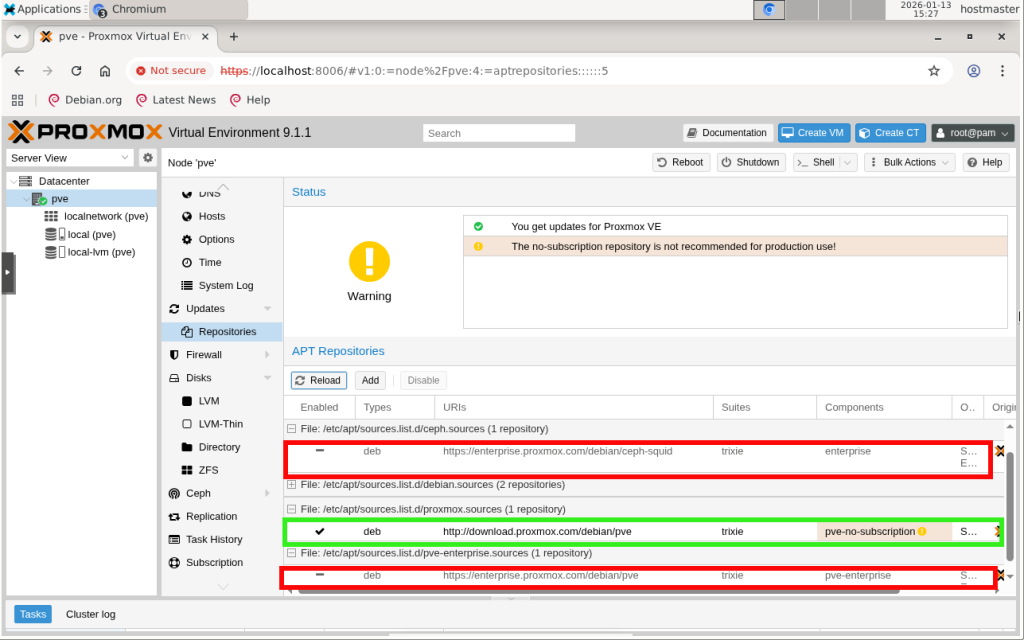
Before proceeding with our configuration, it would be best to update Proxmox and the OS to the latest versions. You can do this either from the CLI or from the GUI. To remove unnecessary errors and warnings during upgrades, we need to disable the enterprise repositories since we will not have any Proxmox Enterprise subscriptions, and add the no-subscription repository.
Storage
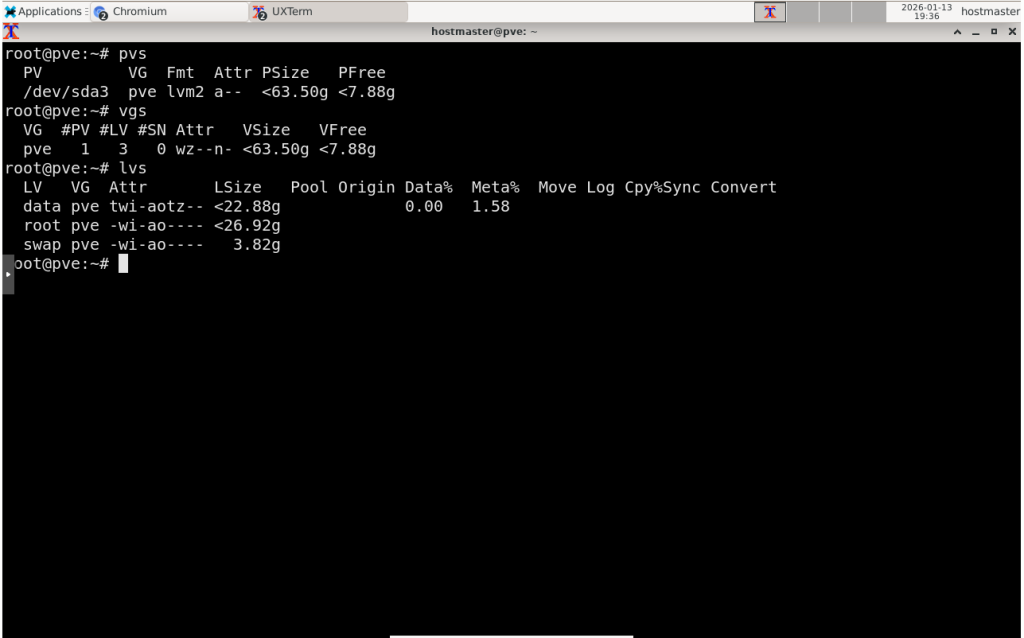
If you chose the default storage during installation, you will end up with the following storage layout (sizes will be calculated based on your storage’s total capacity). You will have one partition, with most of your storage allocated to it. This partition will be configured as an LVM with one (1) physical volume, one (1) volume group, and three (3) logical volumes.
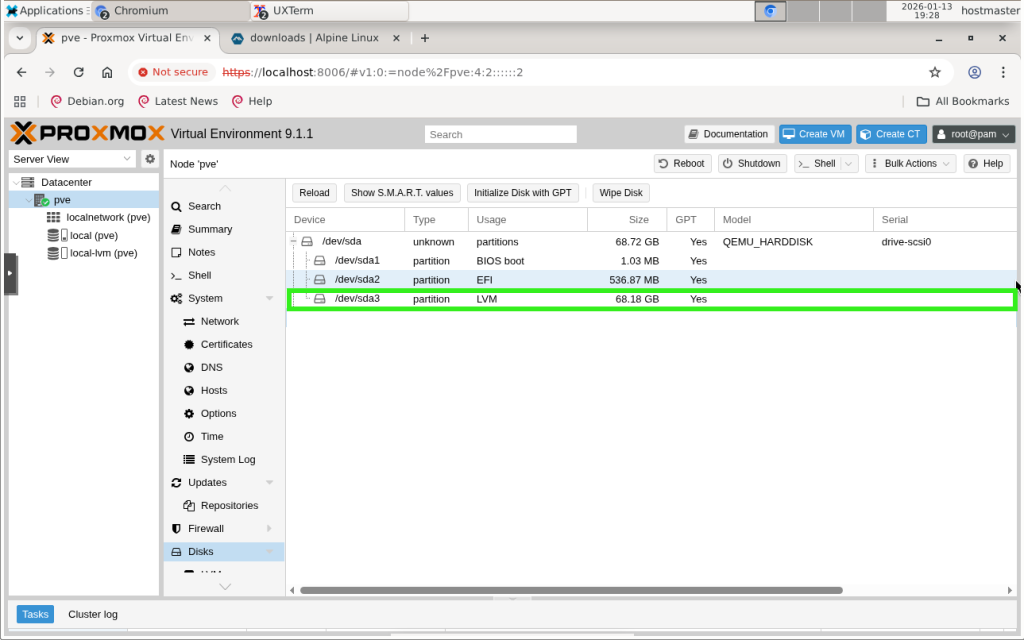
The first logical volume (swap) will be for swap. The second logical volume (root) will be the root partition, which will contain the OS, Proxmox’s libraries and binaries, home directories, and a Data Centre directory for storing ISO images, backups, and CT templates. You cannot use this directory to store the VM’s logical disks; instead, the third logical volume (data) is configured as an LVM thin pool that will host them.
If you have another physical storage device, you can use this to extend the default LVM by issuing a command like:
vgextend pve /dev/sdbOr you can create a new LVM, LVM-thin, or ZFS disk. The Proxmox GUI provides the functionality to create all these types of disks under the ‘Disks’ sidebar menu.
On the topic of disk types, I would argue that an LVM or LVM-thin would probably be the most appropriate choice for a non-production homelab setup, as it is the simplest to manage and slightly faster than ZFS.
Networking
If your machine, like mine, comes with both a WiFi and an Ethernet adapter, you can use both adapters to split your traffic. And if your ISP provides two (2) public IP addresses, like mine, then you can use your WiFi for egress and the Ethernet for ingress. You can design your Proxmox network around these two (2) interfaces. You can create a Linux bridge that only supports egress traffic, so your desktop VM that only needs outgoing internet access, for example, can be placed in this subnet. You can create another Linux bridge that accepts ingress traffic, so VMs running services such as web or mail servers can be placed in this subnet.
The diagram below shows the network configuration I set up on my machine.

There are a total of five (5) Linux bridges.
VMBR0 is where the Ethernet interface is enslaved. This bridge will have only one (1) IP, one of the public IPs provided by the ISP, assigned via DHCP.
VMBR1 is the subnet that expects ingress traffic from the internet, so services such as web and mail will run on it. This bridge itself has no direct connection to the internet. Instead, traffic will flow via VMBR0 using NAT and port forwarding. Because of port forwarding, VMs in this subnet will have fixed IP addresses.
VMBR2 is the subnet for egress-only traffic. Unlike VMBR0, the wireless interface is not enslaved to this bridge (you cannot enslave a wireless interface), and unlike VMBR0, this bridge will not make any DHCP request on behalf of the wireless interface. Instead, the wireless interface will make the DHCP request. Traffic will flow from this bridge to the wireless interface using NAT.
VMBR3 is a private subnet that does not expect any traffic to and from the internet.
VMBR4 is a private subnet with limited internet access. Internal services such as DNS, DHCP, NTP, and NAS will run in this subnet. Only selected VMs that run services requiring internet connectivity, such as NTP, have an internet connection via VMBR0.
Below is how this is implemented in the /etc/network/interfaces configuration file.
auto lo
iface lo inet loopback

allow-mgmt enp10s0
iface enp10s0 inet manual
#       Ethernet network interface.

auto wlp11s0
iface wlp11s0 inet dhcp
#       Wifi network interface.
        wpa-conf /etc/wpa_supplicant/wpa_supplicant.conf

auto vmbr0
allow-mgmt vmbr0
iface vmbr0 inet dhcp
#       Main internet gateway. ISP provided IP Address via DHCP.
        bridge-ports enp10s0
        bridge-stp off
        bridge-fd 0

        post-up   echo 1 > /proc/sys/net/ipv4/ip_forward

auto vmbr1
iface vmbr1 inet static
#       External services. Fix IP. Gateway via vmbr0.
        address 192.168.1.1/24
        bridge-ports none
        bridge-stp off
        bridge-fd 0

        post-up iptables -t nat -A PREROUTING -i vmbr0 -p tcp --dport 25  -j DNAT --to-destination 192.168.1.2:25
        post-up iptables -t nat -A PREROUTING -i vmbr0 -p tcp --dport 80  -j DNAT --to-destination 192.168.1.3:80
        post-up iptables -t nat -A PREROUTING -i vmbr0 -p tcp --dport 443 -j DNAT --to-destination 192.168.1.3:443
        post-up iptables -t nat -A POSTROUTING -s '192.168.1.0/24' -o vmbr0 -j MASQUERADE

        post-down iptables -t nat -D PREROUTING -i vmbr0 -p tcp --dport 25  -j DNAT --to-destination 192.168.1.2:25
        post-down iptables -t nat -D PREROUTING -i vmbr0 -p tcp --dport 80  -j DNAT --to-destination 192.168.1.3:80
        post-down iptables -t nat -D PREROUTING -i vmbr0 -p tcp --dport 443 -j DNAT --to-destination 192.168.1.3:443
        post-down iptables -t nat -D POSTROUTING -s '192.168.1.0/24' -o vmbr0 -j MASQUERADE

        post-up   ip route add 192.168.1.0/24 dev vmbr1 src 192.168.1.1 table wifi
        post-down ip route del 192.168.1.0/24 dev vmbr1 src 192.168.1.1 table wifi

auto vmbr2
iface vmbr2 inet static
#       Egress only VMs. Gateway is via wlp11s0.
        address 192.168.2.1/24
        bridge-ports none
        bridge-stp off
        bridge-fd 0

        post-up   iptables -t nat -A POSTROUTING -s '192.168.2.0/24' -o wlp11s0 -j MASQUERADE
        post-down iptables -t nat -D POSTROUTING -s '192.168.2.0/24' -o wlp11s0 -j MASQUERADE

        #for firewall
        post-up   iptables -t raw -I PREROUTING -i fwbr+ -j CT --zone 1
        post-down iptables -t raw -D PREROUTING -i fwbr+ -j CT --zone 1

        #routes and rules
        post-up   ip route add 192.168.2.0/24 dev vmbr2 src 192.168.2.1 table wifi
        post-down ip route del 192.168.2.0/24 dev vmbr2 src 192.168.2.1 table wifi

        post-up   ip rule add from 192.168.2.0/24 table wifi
        post-up   ip rule add to   192.168.2.0/24 table wifi
        post-down ip rule del from 192.168.2.0/24 table wifi
        post-down ip rule del to   192.168.2.0/24 table wifi

auto vmbr3
iface vmbr3 inet static
#       Internal VMs. No Ingress or Egress.
        address 192.168.3.1/24
        bridge-ports none
        bridge-stp off
        bridge-fd 0

        post-up   ip route add 192.168.3.0/24 dev vmbr3 src 192.168.3.1 table wifi
        post-down ip route del 192.168.3.0/24 dev vmbr3 src 192.168.3.1 table wifi

auto vmbr4
iface vmbr4 inet static
#       Internal services. Selective Egress. Gateway via vmbr0.
        address 192.168.4.1/24
        bridge-ports none
        bridge-stp off
        bridge-fd 0

        post-up   iptables -t nat -A POSTROUTING -s '192.168.4.2/32' -o vmbr0 -j MASQUERADE
        post-down iptables -t nat -D POSTROUTING -s '192.168.4.2/32' -o vmbr0 -j MASQUERADE

        post-up   ip route add 192.168.4.0/24 dev vmbr4 src 192.168.4.1 table wifi
        post-down ip route del 192.168.4.0/24 dev vmbr4 src 192.168.4.1 table wifi

source /etc/network/interfaces.d/*
In the next part of this blog, I will discuss in more detail the networking configuration, particularly how you set up routing when you have two (2) network interfaces.